
Vertical rear wiper DIY help


Thread Starter
|
Member
Joined: Mar 2009
Posts: 75
From: Asia
Vertical rear wiper DIY help
This is a post in response to :
https://www.fitfreak.net/forums/1st-...t-jazz-gd.html
That was a great post and should be helpful for fit owners who want to verticalize its rear wiper.
However, excuse me being a noob, from the steps demonstrated on above post, it is still unclear to me about how we are supposed to take off the black covering of the trunk door in order to expose the inner stuffs under (in this case the dynamo)
Besides, the post only shows diagram pictures from a GD model.
I do not want to break things unnecessarily from my car. If anybody has ever done this to ur GE, could you please clarify?
And after we are done with all the steps, when we are putting back all stuffs together again, in what position should we put the rear wiper back on? Is it vertically or is it horizontally (so the wiper will automatically readjust to vertical position when we turn it on as a result of the steps we did)?
Thanks for your help
Member
Joined: Oct 2008
Posts: 66
From: Singapore
^o^ Photos for verticallizationing of rear wiper for

:: FIT & JAZZ :: GE
1)All E round in red is the clips 1,2,3,4,5,6 & etc ....
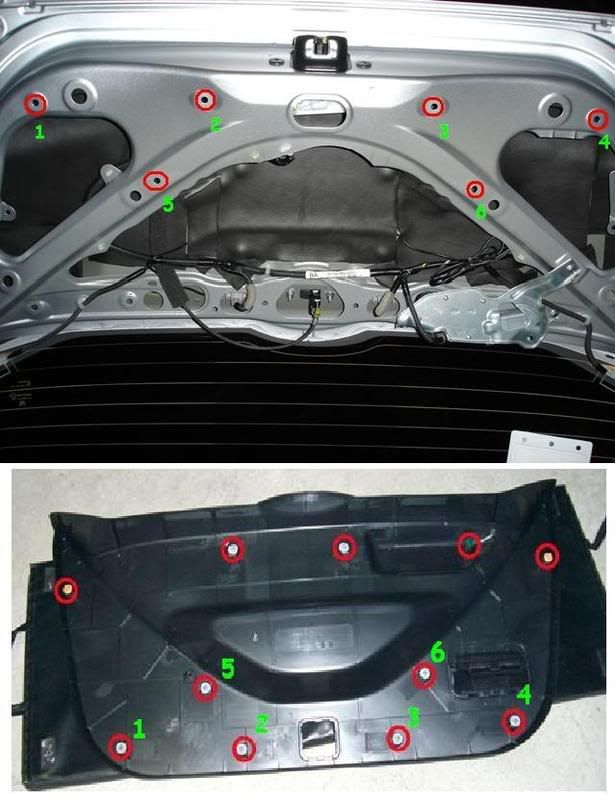
2)after u pull of the black cover u should see
ur wiper dinamo , remove the three bolt round in red ,
the wire cable & holding the wiper compartment on ur car

3)now u already remove the dimano
there's 4 bolt holding this cover round in red

4)now this is what u should see,
there should be 6 hole on it

5)u should get this result
move the arm backward
& now put the metal bar back
than install everything back

hv fun ^o^
:: FIT & JAZZ :: GE
1)All E round in red is the clips 1,2,3,4,5,6 & etc ....
2)after u pull of the black cover u should see
ur wiper dinamo , remove the three bolt round in red ,
the wire cable & holding the wiper compartment on ur car
3)now u already remove the dimano
there's 4 bolt holding this cover round in red
4)now this is what u should see,
there should be 6 hole on it
5)u should get this result
move the arm backward
& now put the metal bar back
than install everything back
hv fun ^o^
Thread Starter
|
Member
Joined: Mar 2009
Posts: 75
From: Asia
Thanks sir wpyeo
I saw this thread before. But my problem lies in step 1, where it only show the position of the clip holes attaching the cover to the trunk.
I am confused how we suppose to pull out the cover. Should we tear the whole thing off with force to pop out the clips off its place? Or maybe there is a spot where we can start with using a tool (like a screwdriver) instead of tearing it off.
I do not want to make any irreversible damage because that is a big chunk I'm pulling out, that's why i am hesitant to use force.
With all regards, could you please clarify a bit further?
Any help will be very much appreciated
just pull REALLY hard. i was scared at first because I thought I would break something (when the clips come off, it makes a really loud POP)
but u can actually bend the plastic just enought to see where the clips are and just pull. I had 2 clips that were still stuck onto the metal frame. I just used dental floss, wrapped it around the clips....and pulled it off.
its very easy.....wear gloves tho. the edges of tend to hurt alittle since you have to use force to rip off the panel.
heres mine:
before

after

Last edited by stalonehong; Jun 18, 2009 at 08:03 PM. Reason: post pictures
Member
Joined: Oct 2008
Posts: 66
From: Singapore
Thanks sir wpyeo
I saw this thread before. But my problem lies in step 1, where it only show the position of the clip holes attaching the cover to the trunk.
I am confused how we suppose to pull out the cover. Should we tear the whole thing off with force to pop out the clips off its place? Or maybe there is a spot where we can start with using a tool (like a screwdriver) instead of tearing it off.
I do not want to make any irreversible damage because that is a big chunk I'm pulling out, that's why i am hesitant to use force.
With all regards, could you please clarify a bit further?
Any help will be very much appreciated
I saw this thread before. But my problem lies in step 1, where it only show the position of the clip holes attaching the cover to the trunk.
I am confused how we suppose to pull out the cover. Should we tear the whole thing off with force to pop out the clips off its place? Or maybe there is a spot where we can start with using a tool (like a screwdriver) instead of tearing it off.
I do not want to make any irreversible damage because that is a big chunk I'm pulling out, that's why i am hesitant to use force.
With all regards, could you please clarify a bit further?
Any help will be very much appreciated


Fyi...
Here is some insightful information, I think... 
https://www.fitfreak.net/forums/fit-...tallation.html
HTH.
https://www.fitfreak.net/forums/fit-...tallation.html
HTH.
Thread Starter
|
Member
Joined: Mar 2009
Posts: 75
From: Asia
aaahh I see now, i will start to pull mine hard then starting today.
I will give u updates soon
Any information about those 5 unnumbered clips from the pictures? Or should I just ignore em?
When we put the rear wiper back on, should I put it vertically? Or should I put it back on its original pos and let the motor reposition itself?
Thanks a lot again sir wpyeo, sir stalonehong, and sir thelox.
I greatly appreciate ur help
starting today.I will give u updates soon
Any information about those 5 unnumbered clips from the pictures? Or should I just ignore em?
When we put the rear wiper back on, should I put it vertically? Or should I put it back on its original pos and let the motor reposition itself?
Thanks a lot again sir wpyeo, sir stalonehong, and sir thelox.
I greatly appreciate ur help
Thread Starter
|
Member
Joined: Mar 2009
Posts: 75
From: Asia
I did it last night, and it worked quite well. Just taking a lil while in repositioning the wiper back to make a perfect pattern on the rear window.
Thanks a lot guys, you have been great help in this matter.
Thread closed
Thanks a lot guys, you have been great help in this matter.
Thread closed


Thread
Thread Starter
Forum
Replies
Last Post
Bthasht
For Sale / Want To Buy / Classified Ads for USED Fit Items
0
Jan 5, 2011 05:56 PM