
What did you do to the GD Fit today?


refitted my front lip, it's about an inch higher now. it's not how its SUPPOSED to be as i can no longer use the middle bracket supports, however it's helped me with my scraping issue. fitment is not bad, tiny gaps near the sides but thats it. i'm thinking i need to screw it one more time just to be safe...
the cutoff of the lip goes just below the foglights themselves now, before it was at the bottom of the housing.
the cutoff of the lip goes just below the foglights themselves now, before it was at the bottom of the housing.
Hey! What you have done is of extreme interest to me... I have no doubts that it looks good since I am already aware of what great pride you take in doing things up tastefully on your car..
well basically the lip is screwed in on the sides as is the stock sport lip, using the same holes. it also has some brackets that go in the middle section (2 of them) that attach to stock holes in the bottom of bumper and corresponding holes on the lip. in order to get the lip to move up i had to get rid of these brackets and essentially redrill the holes in the sides of the lip where it hangs over the rear of the bumper. so i do have 2 extra holes that look horrible...i figure i'll probably bondo them up before i repaint everything.
in order to prevent the lip from flying off on the freeway or something, i will screw from the bottom into the bumper with self taping screws. not the greatest thing but i don't want to risk anything. of course this will all happen once everything's painted.
previously the lip was pushed down to where the top of it would rest on the bottom of the bumper in front of the lower grill. now it's got about a 1in gap between that space, in order to alleviate the pressure from the only screws on the sides of the lip i think drilling up from the bottom will give it some support.
hopefully that all makes sense

lot of work for me

Last edited by kenmei; Feb 9, 2011 at 01:19 AM.
haha yea I bet. when my car was all warmed up it would pull pretty well with the cold IAT, though with the SC I never saw it that low.

Member

Joined: Jun 2009
Posts: 22
From: Houston
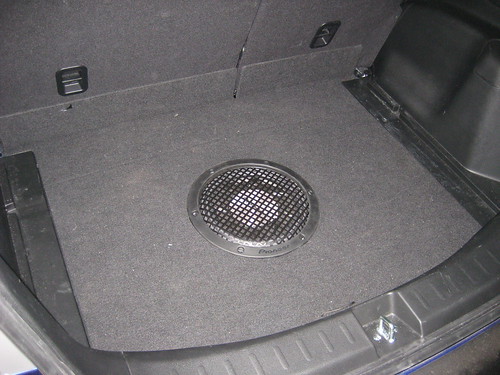
TODAY I MAKING CUSTOM SUB BOX FITTING UNDER BACK SEAT.. TIRED OF TAKING UP ALL MY ROOM IN THE TRUNK.. IL POST UP PICS LATER
shouldn't you be doing some banking work? jk haha yeah I saw that once and never paid much attention to it but I'll look at it again. My preference would be something that could tuck in the corner by the rear lights and have a quick release so if i wanted to take it out i could and the stereo would still work fine. i think i saw one on here like that too
shouldn't you be doing some banking work? jk haha yeah I saw that once and never paid much attention to it but I'll look at it again. My preference would be something that could tuck in the corner by the rear lights and have a quick release so if i wanted to take it out i could and the stereo would still work fine. i think i saw one on here like that too
https://www.fitfreak.net/forums/fit-...tons-pics.html
Member
Joined: Jun 2009
Posts: 22
From: Houston
wish i could bring myself to do this looks so fresh.. but after last years trip, when i was stuck side of the road till tow truck came, because of the simple fact that i didnt have my spare in m trunk.. oh no need that spare haha
ryan.. its not hard if you kno what you doing(im no expert)lol but am willin to try this little project
each sub has there own air space needed to perform all the way. im using 1 8" p2 rocksford fostgate down fire ported box. recommends .75cu ft of air space. take in regards that the subs cap of air taking up. so...80-1.0 cu ft is my goal/ using 3/4 mdf board.
the bad thing is i wont be able to use my "magic seats" what the fit is known for to all modern america.
so yeah will do might even dyi this if i can find my camera..
yeah exactly, the whole "box" if you will lifts out and gives you spare tire access
Member
Joined: Jun 2009
Posts: 22
From: Houston
I hear you and I'm sure you're absolutely correct. I'm not a huge audiophile, just looking for some improvement in sound without taking up cargo space. This project is definitely not for anyone who wants perfect sound quality, just for those who would want an improvement over stock.
QUOTED BY OP. (sub in spare)
i shoot more for sq then efficiency im just sayn.. if ima do something i want it done right. ill lett you kno how this works out for me
Did a little more grinding to my front fender lips last night. Rims tuck gorgeously now no rubs. Also torqued my lower front bar down to spec, it had started making noise on take off. I did not have it tight enough, now shes good.
Off fit, defragged my pc last night. Pics will be up tonight of rims.
Off fit, defragged my pc last night. Pics will be up tonight of rims.


got my vbp colored mugen rear view mirror cover today and put it on late this afternoon. didn't get a chance to take a pic though it was to dark. but i will tomorow. the wheels came out sweet bthasht, looks good man.
Last edited by coreyhall4; Feb 12, 2011 at 12:12 AM.