
DIY: $50 (or less) Intake For The GE. CAI / SRI


Member
Joined: Feb 2012
Posts: 23
From: Nj
Ok so i assembled the setup with the exact same filter and breatherfilter as in OP. I used a 3"-2" from lowes wich made it a bit longer. to make it fit i had to actually remove brake fluid resivoir and move it over 1 screw. my question is this. under the stock air box there is a vaccum hose. i am not sure what it is for and if i disconnected it from anything. right now it is kinda just hanging there. any input?

Member
Joined: Sep 2011
Posts: 180
From: Mililani, Hawaii
you can move the brake fluid reservoir over? i think i'm gonna do that cus right now it's a tight fit. as for your vacuum line, if i'm thinking of the right one, i think it should connect back to the engine. i dont remember where exactly, but if you run the engine you should be able to hear where it goes. a picture would help though.

Member

Joined: Jul 2010
Posts: 208
From: Arkansas
Well, I looked back through this thread and that was when I realized, my intake doesn't have a velocity stack. I got bored, so I ordered this 2" one from a store off eBay that makes performance parts for GM vehicles. I stuck it in a 3-2" hose connector, and I'll slip the filter over the end. It will go from 4" in the filter, to 3, then to 2 through the MAF. The Velocity stack will be after the 3" section, so hopefully this will help some.

This intake thing just keeps becoming a downward spiral. I'm also redoing my heatshield with thicker metal so it doesn't flex and bend so easily. Then I'm rerouting the tubing to sit behind the headlight.
Thanks, Lyon, for mentioning about the area behind the battery and headlight. Right now I have the tubing running somewhere else that might be too warm.
Member
Joined: Jul 2010
Posts: 208
From: Arkansas


Member
Joined: Jul 2010
Posts: 208
From: Arkansas
That looks really good, KC!
I'd watch that factory boot though...I had to take mine off because it kept wanting to slip off the MAF tube from the weight...I think I had a slow leak for 2 years after I started realizing it was slipping off. You can make a 2" pipe boot fit over it and the throttle body with some very very careful stretching. That's what I did...but it might make your filter rub the master cylinder from some added length. I used a shorter filter and have no troubles.
I'd watch that factory boot though...I had to take mine off because it kept wanting to slip off the MAF tube from the weight...I think I had a slow leak for 2 years after I started realizing it was slipping off. You can make a 2" pipe boot fit over it and the throttle body with some very very careful stretching. That's what I did...but it might make your filter rub the master cylinder from some added length. I used a shorter filter and have no troubles.
Member
Joined: Jul 2010
Posts: 208
From: Arkansas
Speaking of which...I did some testing and found out my tubing only made -1 degree of temperature difference. At Ambient under hood temperature of 128 degrees, with a coolant temp of 190 degrees, and 16% humidity, my IAT's were reading 132 without the tubing, 131 with it. So I took it all out (Which was a pain, because I had to loosen the brackets holding the PCM in place, which means I had to take the battery out...that's like the 20th time I've done that). I took a 5" Pipe cap and cut a section out and put some trim seal on it and heat tape and made a lid so my filter is totally enclosed in a sort of scoop that opens to the factory scoop...
I'll do some temperature/flow tests when it's not so heat-stroke inducingly hot here!
I'll do some temperature/flow tests when it's not so heat-stroke inducingly hot here!
Member
Joined: Jul 2010
Posts: 208
From: Arkansas
you can move the brake fluid reservoir over? i think i'm gonna do that cus right now it's a tight fit. as for your vacuum line, if i'm thinking of the right one, i think it should connect back to the engine. i dont remember where exactly, but if you run the engine you should be able to hear where it goes. a picture would help though.
Last edited by kurisux92; Jul 3, 2012 at 02:05 PM. Reason: Omission of a word
Member
Joined: Feb 2012
Posts: 63
From: charlotte,north carolina
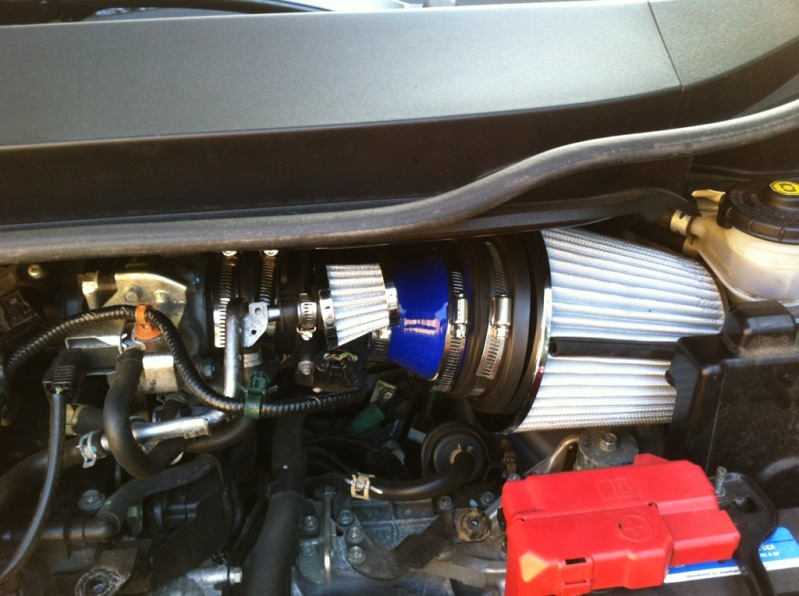
ok so i got lucky with my intake my dad bought a injen intake for his g37s limited and it comes with a left and right intake for each throttle body. well long story short they boxed it wrong and sent two left side pipes , and then sent a right to fix issue so now i had a pipe sitting in my garage for a long time...... i took the senor of my fit to see if it was the same screw patterent well it was so i busted out the hack saw and made this for temporary until i can get out the alluminum welder to make some lobster back welds and to make a 90 degree bend and add more piping for a cold air

$43 on filter and $11.62 coupler to throttle body
$43 on filter and $11.62 coupler to throttle body
I plan on doing this but I'm trying to find the right filter for me. I've been looking at the Weapon-R Secret Weapon air filter. It has a built in velocity stack so I was thinking that might be a bit better. The drawback I can see is that it's about $65. Does anybody have any expierience with this filter or using this filter in a DIY intake?
Member
Joined: Jul 2010
Posts: 208
From: Arkansas
I plan on doing this but I'm trying to find the right filter for me. I've been looking at the Weapon-R Secret Weapon air filter. It has a built in velocity stack so I was thinking that might be a bit better. The drawback I can see is that it's about $65. Does anybody have any expierience with this filter or using this filter in a DIY intake?
I do question how well the velocity stack it has "built in" will help, though. Where is it located? On the end of the filter housing, or inside, where it connects to the tubing?
Whether it's in either location, you will not see the full benefit of a velocity stack that way, because the smallest size they make those filters in is 3" (If not, 2.5" which is still too large), being still bigger than your MAF tubing.
If you will pardon my crude drawing:
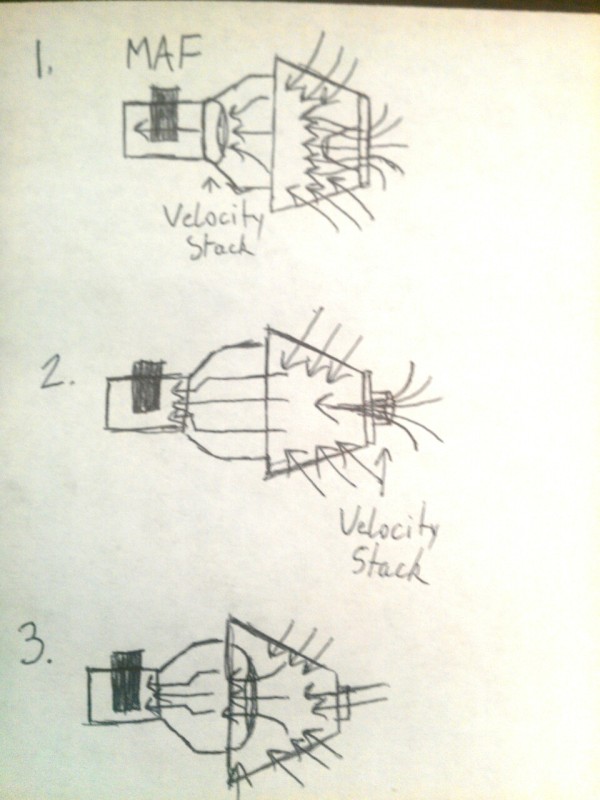
1. shows how my intake is set up. All of the air is taken in by the filter, where it is reduced from 3" inlet to 2", with a velocity stack at the smallest point.
2. Shows the Secret Weapon filter, IF the velocity stack is located at the end of the filter housing. As you can see, the air that is actually "contoured" by the velocity stack will be mixed with air taken in around the filter element and then pulled through the reducing coupler, where the air is "pinched" at the MAF.
3. Shows the Secret Weapon filter, if the velocity stack were located where the filter attaches to tubing. The air is contoured, but it still suffers the problem of being pinched at the MAF from being reduced in tubing size with a harsh angle.
To take full advantage of what a velocity stack/funnel has to offer, it really needs to be located at the narrowest point of your tubing after your filter. If you REALLY want the Secret Weapon filter just for saying you have something from Weapon-R, you can go ahead and use it, but you more than likely won't be getting the full effect of a velocity stack. It will be better than nothing, though.
For 65-70, you could buy a 2" Velocity stack to adapt to a 6" cone filter from someone like Blox Racing. And then if you were deadset on using a foam filter, you could purchase a 6" foam core filter from someone such as Volant.
Member
Joined: Jul 2010
Posts: 208
From: Arkansas
I think you can buy a filter and velocity stack to 2" from Blox. Might wanna double check, but that would probably be the best bet. You just might have an issue with it clearing the master cylinder though.
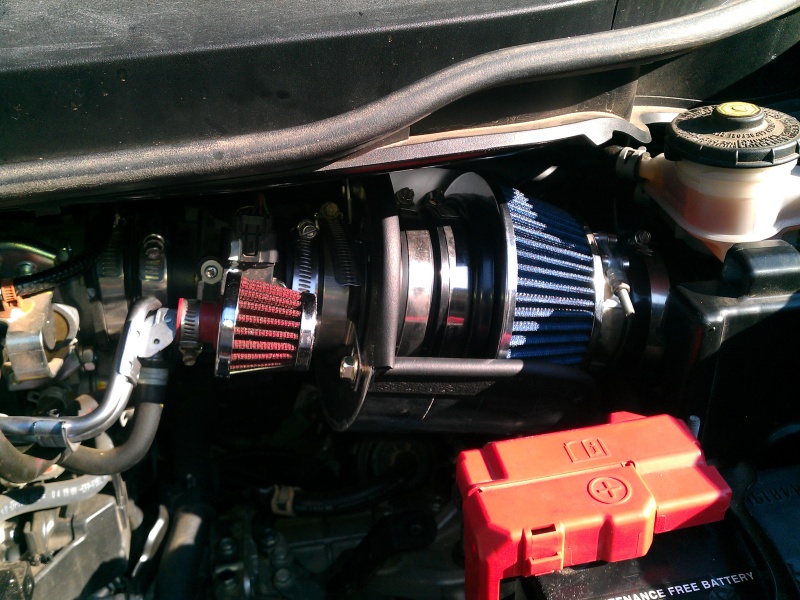
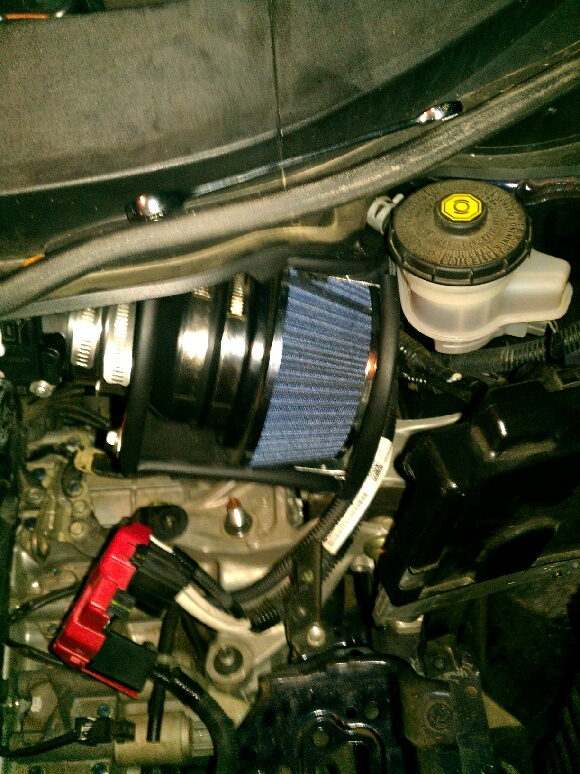
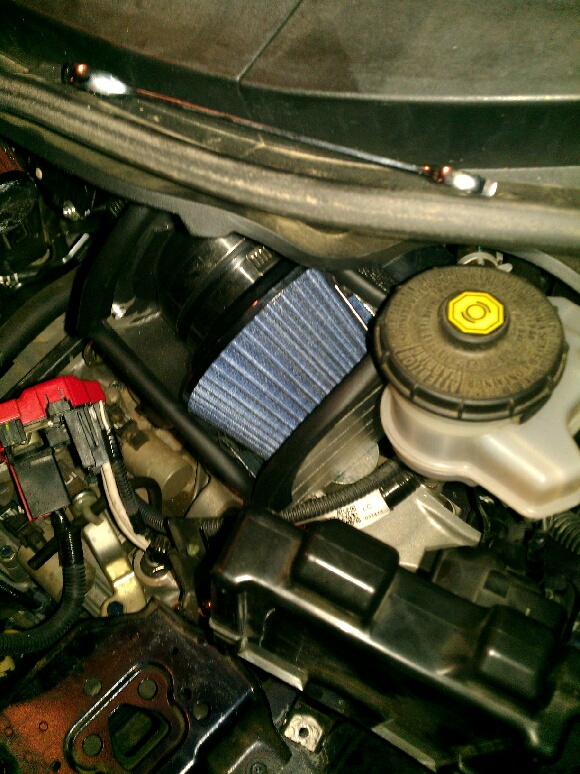
Well I finally made my DIY intake! For all you guys that said it only took within an hour, I commend you. I'm not, not mechanically inclined but this one kicked my ass a little. Maybe it was the heat? Oh well, it's done and it sounds pretty awesome! Reving at first gives it an air suction sound followed by a mean little roar. Saving all the OE parts just in case. I'm also keeping a ratchet in the car if the clamps let loose.
Member
Joined: Feb 2012
Posts: 23
From: Nj
I did this intake and wound up having to remove it. It worked great when I first put it in. the car was loud and moved, but weeks later i began to notice things. i was loosing throttle responce and found myself stalling. I decided to investigate. i removed the intake and what did I fing. the MAF tube that we cut melted. it was no longer round but began to implode allowing air leak out and in to the throttle housing. i tried everything i could to brace it or repair it but to no avail. I ordered the stock airbox again and reinstalled it. i was having less problems but still i was stalling occasionally. so i bit the bullet and took my car back to honda. (i am still under warranty) they checked it out and i was told i needed to have all my valves adjusted and the system needed to be decarbonized. i dont totally blame the $700 repair build from the intake, but I do feel it contributed. So a word from the experienced procede with caution
Member
Joined: Jul 2010
Posts: 208
From: Arkansas
That's really strange. I've had this same cut piece of MAF tubing for 2 years, even in 120 degree humid weather here in AR where I was making long trips and I haven't had ANY issues with it melting. I believe it's made out of polyproplene like the manifold plenum, which means it shouldn't have melted. Sounds like yours was defective or something. Not only that, why was it happening after you had cut out from air box lid, but not in the factory box?
Something about yours doesn't add up.
Something about yours doesn't add up.
Member
Joined: Feb 2012
Posts: 23
From: Nj
i dont know. i believe it was factory, I bought the car certified and all the parts say honda on em. I just looked and it kind of looked like pacman shape. if you can picture it. it was very soft to the touch i could actually bend it back but the damage was done