
Installed: Variable Intermittent Wipers 2009 USDM Fit Sport MT Non-Navi


I printed this picture and took it under the dash with me to help me try and locate the connector but Im still lost. Niko says its behind the fuse panel. Do I need to drop the fuse panel to reach this connector?

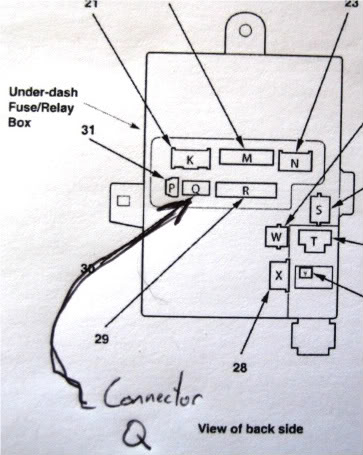
I printed that one out too niko. Its probably right in front of my face but I jsut cant see it.  I ran the wire from the stalk so I just have to locate the connector to hook this up. What I thought would be a quick install turned into an all day affair and Im still not done. This is how most of my DIY's turn out.
I ran the wire from the stalk so I just have to locate the connector to hook this up. What I thought would be a quick install turned into an all day affair and Im still not done. This is how most of my DIY's turn out. 


I printed that one out too niko. Its probably right in front of my face but I jsut cant see it. I ran the wire from the stalk so I just have to locate the connector to hook this up. What I thought would be a quick install turned into an all day affair and Im still not done. This is how most of my DIY's turn out.
I ran the wire from the stalk so I just have to locate the connector to hook this up. What I thought would be a quick install turned into an all day affair and Im still not done. This is how most of my DIY's turn out. okay i went out in the garage and looked at it for you.
first you have to get on you back and look straight up.
in the postion your in it will be on the top side of the fuse panel.
just next to it will be another silver box. i think that is the computer.
if you put you hand up there you'll feel the plugs but you can't see them
unless you have a mirror.
i hope this helps.
okay i went out in the garage and looked at it for you.
first you have to get on you back and look straight up.
in the postion your in it will be on the top side of the fuse panel.
just next to it will be another silver box. i think that is the computer.
if you put you hand up there you'll feel the plugs but you can't see them
unless you have a mirror.
i hope this helps.
okay so to confirm it your using part #04320-SAA-A00. correct?

Sorry to be late on the relies... been out of town the past week.
The above posts are correct... if you're staring at the fuses/fuse box... the connector is on the back side of it. You can't see it without a mirror.
I reached my hand up... felt the connectors using the layout of the pictures above, and then unplugged it. You'll only have about 2-3in of slack where you can pull the plug over to open it up to add the new pin.
No easy way about it. Its cramped and tight.
Make sure you leave enough slack in the wire you add... the steering column needs to be able to telescope out.
(I made it a little short the first time...)
Mike
Last edited by mscott; Aug 22, 2009 at 03:37 PM.
well i went to the dealer today and tried to get 04320-saa-a00
they didn't have it
so then i asked if they had 04320-SP0-A00 and they did.
well long story short 04320-SP0-A00 is the wrong part.
i repeat 04320-SP0-A00is not the right wire. do not buy it.
this totally sucks
i was ready to do it all but got the wrong parts. oh well.
but i did get a chance to take it all apart and look at it.
can anyone confirm that both wires on both clips are the
same? when i was looking they looked different. the fuse box
one looked smaller.
Sorry to hear that. I had ordered the B00 version thinking that might work as well. it didn't fit into the Q connector either. Already updated the post...
Wish I had a part number for ya, but when I installed this I happened to find a pin in a stack of old wires that worked.
The ones on the Q connector looked smaller to me, and the way you open up the base is a lot different that the wiper stalk connector. Did you already open the steering column and try it in the wiper stalk?
I just tried to get my hands back there and its impossible for me. Damn hands too fat!! To drop the fuse box down is it just that single silver screw on the top? Is there any danger in dropping that down to get to the connector? Id hate to screw up my electricals to get this mod done.
Well, I figured out why I couldnt get my hands behind there... My stereo installer tucked the crossovers for my speakers back there.  I got the Q connector off and tried to get my repair wires on it and it was really tight. I think it is different from the wiper stalk side. I managed to slide it part of the way and decided to test it out, but it didnt work.
I got the Q connector off and tried to get my repair wires on it and it was really tight. I think it is different from the wiper stalk side. I managed to slide it part of the way and decided to test it out, but it didnt work.
Good job, mscott! Great addition to your comfort level!
I'd consider this mod for my GD-3, but the Aquapel makes wipers unnecessary at highway speeds.
What's the deal...
ON:

OFF:

Easy choice!

I'd consider this mod for my GD-3, but the Aquapel makes wipers unnecessary at highway speeds.
ON:
OFF:
Easy choice!

The new wiper stalk and the pack of yellow pigtails with pins came in and I've taken things apart to check things out and then put them back together again.
I guess I've now joined those who are stuck for want of the correct pin at the Q connector.
Incidentally, I've gotten to the Q connector, but what's the technique for opening it up to slide a new pin in (assuming eventually I'll have one)?
Anyone gotten any further with tracking that pin down?
Paul
I guess I've now joined those who are stuck for want of the correct pin at the Q connector.
Incidentally, I've gotten to the Q connector, but what's the technique for opening it up to slide a new pin in (assuming eventually I'll have one)?
Anyone gotten any further with tracking that pin down?
Paul
For a test, I installed a pin from a metra harness 71-1729. It has about 20 of the small pins needed and 4 larger pins. (Less than $15 online)
The smaller metra pin fit into the Q connector without having to pull the clip apart or anything. I was able to push the pin into the back on the connector until it was all the way in. However, the connector retainer does not lock into the metra pin. You can pull the pin back out, but it is a snug fit. I had to use a small screwdriver to fully seat the pin into the connector.
You've got a 50/50 chance of putting the pin in the right way. If the hole is blocked when seated... pull it out, turn it around 180degrees and try again.
To actually remove the pin, I used a pick (small ice pick with a handle) and pushed it into the rectangular pin release slot as far as it would go. I then pulled on the back of the wire to get it to come out.
Mike
Last edited by mscott; Aug 23, 2009 at 09:02 PM.