
Installed: Variable Intermittent Wipers 2009 USDM Fit Sport MT Non-Navi

Member

Joined: Feb 2009
Posts: 25
From: Brazil, Sao Paulo
justintime, here is my guess.
As you can see in the photo there are 2 Rectangles that might be some kind of Lock for this connector (on both sides). If you press them with a small screwdriver or something similar, the white part might pop-out.
Another question, have you tried the 04320-SAA-A00 on this connector ? (Sorry if I'm being annoying with a lot of questions).

NIKO:
Currently trying to get this installed. I'm having 2 issues:
1) Wiper connector: Does the white inner part need to be separated from the black outer casing of the connector, in order to push the pin in properly? If so, how to disengage these 2 parts
2) Q connector: Once we disconnect this from the fuse box, should we just push the pin right into the connector from behind, or do we have to 'disengage' the connector itself? I think I recall this type of green Honda connector REQUIRES that the piece be disengaged some way in order to allow the pins to fit in. By the way, seems the pins are directional, only go in one way.
My back is hurting with this. I had to stop.
yes on both Q and wiper you have to open the clips up.
for the wiper use two small screw drivers at the same time.
as for the Q i used one hand and a small screw driver.
but again yes both clips have to be open to put the wires in.
and they do go in one way. so get a good light and make sure
you put them in the right way the first time. trying to take those
out is a nightmare. trust me.
Done with the wiper end, thanks.
As far as the Q connector... guys, this is next to impossible. Even without opening the clip, I think it's hard as heck with such little space. Now that Im told we need to disconnect the clip, well, impossible!!!!! I don't know how you did it Niko. I'm convinced this is impossible for me to do. And I *did* manage to do this same mod to my CRV!
As far as the Q connector... guys, this is next to impossible. Even without opening the clip, I think it's hard as heck with such little space. Now that Im told we need to disconnect the clip, well, impossible!!!!! I don't know how you did it Niko. I'm convinced this is impossible for me to do. And I *did* manage to do this same mod to my CRV!
i did the Q with one hand. just get a small screw driver and pry one
end of the clip off at a time. get to it from the side. this is the hardest
part. once this is open the wire just slides in and locks in.
so be careful you put it in the right way.
end of the clip off at a time. get to it from the side. this is the hardest
part. once this is open the wire just slides in and locks in.
so be careful you put it in the right way.
yes you have to unplug it. keep at it you'll get it. only one hand can do it
cause two don't fit. LOL
SUCCESS! All done with the mod, and looks/works perfectly.
BIG thanks to Niko for all the invaluable help. Would have never been able to complete this without his input -- kudos. Also mscott for all the original info!!!!
Some tips for others:
-You need t set aside 90+ minutes for this mod. It takes a good while to figure out best way to work on the Q connector.
-You need to STRETCH before starting this! Believe me, you are about to find yourslef in very awkward positions under the dash.
-Be ready to work with ONLY ONE HAND under the dash. There is just no way around it. This takes a lot of time and patience, especially the unclipping of the Q connector, which is necessary to get the pins inside.
-If you have large hands, are over 45, and/or very clumsy, forget it!!! EDIT: unless you work on aircraft LOL
Last edited by justintime; Sep 4, 2009 at 09:59 PM.
Well I have large hands, I'm 6'4" and I'm 46 but I'm not biting on the forget about it part !!!! Working on aircraft for a living for most of my adult life I've been in tight spots where you have to work just by feel as you can't see what your working on and have managed my way through it. So I think I might be able to manage this. Worse case if it's to tight to fit my body under the dash I'll remove the drivers seat. Just got the wires from Niko (Thanks Nick) now just waiting on wiper stalk which should be in next week.


Bigmitch... this mod is easy compared to planes. I'm ex-USAF myself. Under the dash of a Fit is down-right comfortable compared to some of the stuff I've worked on.
I reclined the drivers seat back as far as I could and laid on it upside down. Mini-mag light in my teeth and then got to work.
For the backs of the connectors... I used a couple small screwdrivers like Niko.
I reclined the drivers seat back as far as I could and laid on it upside down. Mini-mag light in my teeth and then got to work.
For the backs of the connectors... I used a couple small screwdrivers like Niko.

Hey can someone confirm these are the steps for Q connector.
1. Unplug Q Connector by just pulling it out.
2. Use 1 Hand and small screw driver to unclip both sides of the Q Connector.
3. Insert Wire through Q Connector and plug into UDF.
4. Put Q Connector back together.
5. Plug Q Connector back into UDF.
1. Unplug Q Connector by just pulling it out.
2. Use 1 Hand and small screw driver to unclip both sides of the Q Connector.
3. Insert Wire through Q Connector and plug into UDF.
4. Put Q Connector back together.
5. Plug Q Connector back into UDF.
Note to all:
The orientation of the pins makes a difference. Be sure to put the in correctly the first time!
For the wiper side, when you separate the 2 pieces of the connector apart (black / white), you will be able to clearly see the proper orientation of the pins by looking at the other ones. Just insert the new pin in the same way.
On the Q connector you won't see a darn thing. However here's the trick (Thanks Nik for explaining this over the phone!!!)
The Q connector clip will hinge in one direction. Let's say that it hinges UP. You want the side of the pin with exposed wiring facing UP as well. If the hinge is down, then wire facing down...
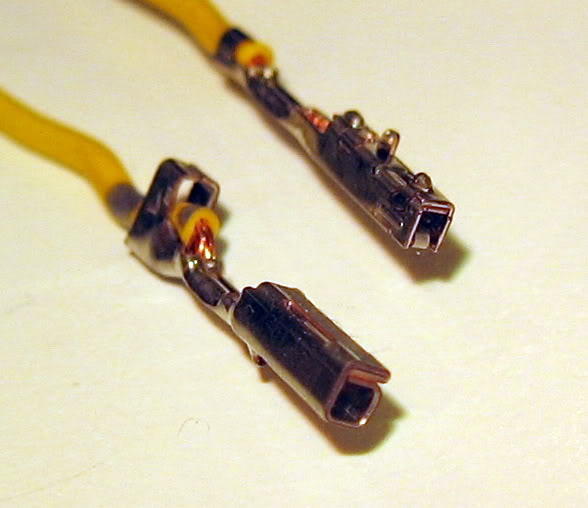
This is what I call wiring facing up:
The orientation of the pins makes a difference. Be sure to put the in correctly the first time!
For the wiper side, when you separate the 2 pieces of the connector apart (black / white), you will be able to clearly see the proper orientation of the pins by looking at the other ones. Just insert the new pin in the same way.
On the Q connector you won't see a darn thing. However here's the trick (Thanks Nik for explaining this over the phone!!!)
The Q connector clip will hinge in one direction. Let's say that it hinges UP. You want the side of the pin with exposed wiring facing UP as well. If the hinge is down, then wire facing down...
This is what I call wiring facing up:

Glad to see the successes rolling in. I hope to get time to complete this mod tomorrow afternoon.
I have both the Q pin and the wiper pin each with an 8" wire pigtail already crimped in. That's how they arrived. If I join them together with no waste, the result will be 16" long plus pins (about 17 1/4" including the pins). Is this long enough ?
Incidentally, how did you guys join wires? Solder and shrink-wrap? Crimp connectors? Insulation displacement type tap? Or did you open up the crimps in the pins and solder or crimp a new single piece wire? Just curious.
Paul