
What did you do to your GE fit today?

Member
Joined: May 2012
Posts: 222
From: North Texas
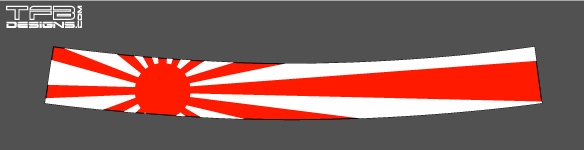
Looks great! I JDM'd mine about a week ago. Loving the unique look!
Might I recommend debadging the dealer sticker and plate frame? Also you might debadge the FIT logo. I think a bare ass would make that red Fit pop!

Might I recommend debadging the dealer sticker and plate frame? Also you might debadge the FIT logo. I think a bare ass would make that red Fit pop!


Actually did that after wiper mod, debadged and put on some plain black plate frames just did not get pictures. Thanks.


for me, i drove the '12 to work. the return spring i added on the gas pedal felt kinda heavy so im going to swap out with a softer spring. details in my blog from saturday.
JDM rear wiper...for me in snow belt state, that is guaranteed snappage when i scrape the rear window.

I'm in Kansas, and when it gets real snowy and icey outside I find the rear defroster takes care of the back window in a matter of minutes. Never scrape mine.

Why don't you actually do something with the car rather than just add needless things that you think will make it more capable?


Member
Joined: Jul 2012
Posts: 78
From: Ky
Zoom Zoom...
Well I bit the bullet today and installed Kumho Ecsta 4x 205x50/16 tires
on my PPM 2012 Fit Sport A/T.
Wow!
The combination of Swift Springs, Progress anti-roll bar and the
Kumho tires really change the character of the Fit.
It is zoom zoom all the way
The Kumhos are *much* guieter and grippy than the OEM Dunlops.
I can really fly around corners with confidence...
It really would be nice to be able to get some reasonable
acceleration out of the Fit...
Jerry

Member
Joined: Aug 2012
Posts: 165
From: San Ramon, CA
The OEM rear bumper applique just arrived today...and is now installed on my 2012 base TW Fit. Some have written about not liking them and peeling theirs off when they got a car that already had it applied by the dealor. But even with extreme care, I already had one small mar of the bumper after only 3 weeks, so I'm glad I decided to add this to mine. (Had they had a color option and one in white it would have been better, but a clean looking black bumper guard looks better than a scratched or marred white bumper, IMHO.)
I unrolled it and laid it flat for a few minutes, but there weren't any wrinkles in it anyway. And it's a warm (~80 deg F) day so warm enough to apply. Cleaned surface with the alcohol swab, let it dry, and meticulously followed the application and smoothing instructions. Even so, a couple minutes later a few bubbles had appeared, each the size of a pinto bean or smaller. They refused to be smoothed out until I used a needle to poke a miniscule hole in each, so the trapped air could escape and the glue adhere when I smoothed it again. Now it looks just like it should, and I'm pleased.
It would have been better had the instructions had the hint about needle poking to help eliminate stubborn bubbles. Had I not known of and successfully used this method in decals in the past, I'd have had a permanently bubbled applique, even though the bubbles were very small and few. I'd probably be the only one to see them, but I bet I wouldn't have been able to open my rear hatch without noticing them and having my BP go up a point or two. Thanks to my wife, who helped me line it up and went for a needele in my trime of need. I knew I liked her!
Haha wifey to the rescue.
I just stuck down the side with the short side of the paper backing removed while at the same time removing the rest of the backing slowly and using the supplied "smoother" on the other side while peeling and it kept the bubbles out
Ken, it's more like skateboard grip tape.
Actually I think it IS skateboard grip tape...
Member
Joined: Aug 2012
Posts: 165
From: San Ramon, CA
Yeah, that's pretty much how I did it too...and it looked fine for the first few minutes. but it undoubtedly was my poor control using essentially one hand for the application.
And about it being similar to skateboard tape, makes me think if my door jams get scrapped up, I might look at skateboard grip tape as a suitable door jam covering...it would certainly be cheaper than anything OEM for the same purpose. But I think I'll wait before doing that, and only if the jams start looking poor.
I wouldn't have tried a wet install like for clearbra, since the instructions were very specific otherwise.
Haha wifey to the rescue.
I just stuck down the side with the short side of the paper backing removed while at the same time removing the rest of the backing slowly and using the supplied "smoother" on the other side while peeling and it kept the bubbles out
Ken, it's more like skateboard grip tape.
Actually I think it IS skateboard grip tape...
I just stuck down the side with the short side of the paper backing removed while at the same time removing the rest of the backing slowly and using the supplied "smoother" on the other side while peeling and it kept the bubbles out
Ken, it's more like skateboard grip tape.
Actually I think it IS skateboard grip tape...

Yeah, that's pretty much how I did it too...and it looked fine for the first few minutes. but it undoubtedly was my poor control using essentially one hand for the application.
And about it being similar to skateboard tape, makes me think if my door jams get scrapped up, I might look at skateboard grip tape as a suitable door jam covering...it would certainly be cheaper than anything OEM for the same purpose. But I think I'll wait before doing that, and only if the jams start looking poor.
I wouldn't have tried a wet install like for clearbra, since the instructions were very specific otherwise.
And about it being similar to skateboard tape, makes me think if my door jams get scrapped up, I might look at skateboard grip tape as a suitable door jam covering...it would certainly be cheaper than anything OEM for the same purpose. But I think I'll wait before doing that, and only if the jams start looking poor.
I wouldn't have tried a wet install like for clearbra, since the instructions were very specific otherwise.
thanks for the info. my Fit is like a work horse so a few scratches from daily use is okay. key'ed scratch, not okay. 

