
What did you do to your GE fit today?


The dome light can be ordered at www.japanparts.com. They have quite a few parts for GD and GE Fits. 
Last edited by xizorian; Jan 23, 2013 at 09:33 AM. Reason: misspell
Haha! Too funny. Reminds me of the jingle: "I can't spell VW, but I drive a Porsche, cause I'm a blonde, yeah yeah yeah."
How long does it take to go 80 miles if you are driving 80 mph? Follow this link to find the most funny answer ever!
https://www.facebook.com/photo.php?v...type=2&theater
https://www.facebook.com/photo.php?v...type=2&theater
Member
Joined: May 2012
Posts: 222
From: North Texas
Washed it and finally got rid of all the hard water spots on the windows. 
https://www.youtube.com/watch?v=CbYMJD4z1pY
https://www.youtube.com/watch?v=syJ9eKny5QI
https://www.youtube.com/watch?v=CbYMJD4z1pY
https://www.youtube.com/watch?v=syJ9eKny5QI
Today I washed the Fit after about 4 weeks since the last wash. She really needed it but I've been too busy to get out and get it done. Tonight I'm going to pick up an oil filter and change her oil in the morning for the first time myself.
Yesterday I ordered some replacement White LEDs for the Parking Lights up front.

New Member
Joined: Mar 2011
Posts: 13
From: Portland, OR
I need more power!
Installed a dedicated 2.1 amp USB power port in the dash with a 1.0 amp power into the glove box. (the glove box power will eventually be removed and used to power a car DVR when I finally decide which unit to buy.)
I took apart and soldered on some leads then added a circuit to the ACC fuse spot. Total cost under $30. Would be slightly cheaper for you apple fans since I needed a to get my Android to full power charge out of a USB port.
. It is about 20mm in diameter, but the 19mm hole maker from my heated seat switch install worked perfectly.
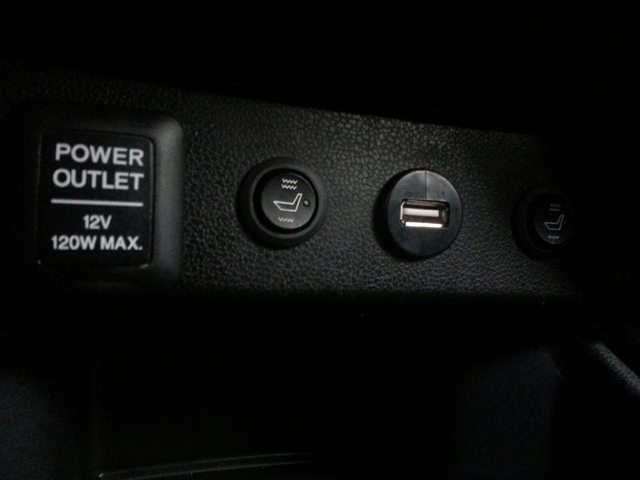
This project took about an hour. It would have taken less time if I was better at soldering.
So with extra time on my hands and being dejected that this USB project was so easy... it was time to tackle the hookup for my heated mirrors. I ran the lines about a year ago when I added side winkers. That was, by far, the hardest mod to date. About 12 hours to get those stupid wires to run through the factory wire harness. Ugh. And another 4 hours to pull the mirrors out of the casing and scrape down that black adhesive on the back and stick these heaters on. The power supply says that together, they pull 1.4 amps. I can see the outline of the heater elements in about 10 seconds. They do defog the whole mirror in about a minute.
I bought a relay and was trying to find the defrost switch wire. Googling around and found out that Goobers thought fuse 55 might be switched on when the defogging switch is on. Pulled out my DMM and sure enough it was true!! Added a circuit to fuse 55. Bam we have power. Amazingly easy wiring. They go on and off with the factory defog switch.
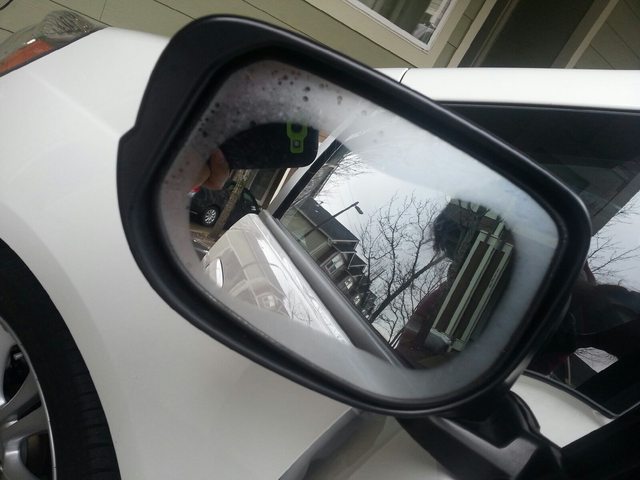
WAIT! Something happened. I think the passenger side mirror might have arced and melted the backing on the mirror a little. The second time I turned them on this little yellow dot appeared. It looks to be one of the contact points of the heater. It still heats up, and the spot didn't seem to get bigger when I left it on for about 10 minutes.
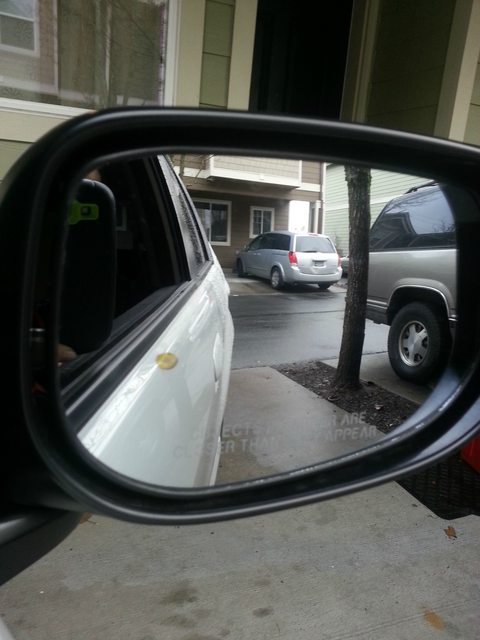
I am ordering a new heater and replacement glass. I think I didn't isolate the leads well enough. Will take it apart and see when the replacements get here.
~Syne
I took apart and soldered on some leads then added a circuit to the ACC fuse spot. Total cost under $30. Would be slightly cheaper for you apple fans since I needed a to get my Android to full power charge out of a USB port.
. It is about 20mm in diameter, but the 19mm hole maker from my heated seat switch install worked perfectly.
This project took about an hour. It would have taken less time if I was better at soldering.
So with extra time on my hands and being dejected that this USB project was so easy... it was time to tackle the hookup for my heated mirrors. I ran the lines about a year ago when I added side winkers. That was, by far, the hardest mod to date. About 12 hours to get those stupid wires to run through the factory wire harness. Ugh. And another 4 hours to pull the mirrors out of the casing and scrape down that black adhesive on the back and stick these heaters on. The power supply says that together, they pull 1.4 amps. I can see the outline of the heater elements in about 10 seconds. They do defog the whole mirror in about a minute.
I bought a relay and was trying to find the defrost switch wire. Googling around and found out that Goobers thought fuse 55 might be switched on when the defogging switch is on. Pulled out my DMM and sure enough it was true!! Added a circuit to fuse 55. Bam we have power. Amazingly easy wiring. They go on and off with the factory defog switch.
WAIT! Something happened. I think the passenger side mirror might have arced and melted the backing on the mirror a little. The second time I turned them on this little yellow dot appeared. It looks to be one of the contact points of the heater. It still heats up, and the spot didn't seem to get bigger when I left it on for about 10 minutes.
I am ordering a new heater and replacement glass. I think I didn't isolate the leads well enough. Will take it apart and see when the replacements get here.
~Syne


Looks good. Still in the low 20's here in the Northeast so mine will have to stay dirty a bit longer. I like your license plate. Just not loving the offset location. I know lots have done this mod and everyone's opinion is different, but to my conservative eye, the plate would look better in it's original centered position.
Member
Joined: Jan 2012
Posts: 566
From: MN
Wow I'm not even going to beat around the bush, your car makes me LOVE the 2012 sport model. Great job!
Although I am setting a bit tired of the whole yellow overlay look. That's why i will probably take my overlay off and finally do my IS300 fog retro. (If I ever get my damn raise at Toyota. Lol I know. The irony)

Member
Joined: Dec 2012
Posts: 20
From: Metairie, LA
Looks good. Still in the low 20's here in the Northeast so mine will have to stay dirty a bit longer. I like your license plate. Just not loving the offset location. I know lots have done this mod and everyone's opinion is different, but to my conservative eye, the plate would look better in it's original centered position.
Were I to do an offset like that, I wouldn't offset it as far, and I'd use shims to make the left side stick out from the bumper farther so that the plate is still perpendicular rather than angled to the left. But that's just me�


Looks good. Still in the low 20's here in the Northeast so mine will have to stay dirty a bit longer. I like your license plate. Just not loving the offset location. I know lots have done this mod and everyone's opinion is different, but to my conservative eye, the plate would look better in it's original centered position.


I see your point. I just recently removed mine totally. (I'll keep it off until someone officially asks me to put it back on). The area under the plate was a real mess. There was an ugly center hole from the dealer, which I had to plug, and also a bunch of scratches from the original plate holder, which I buffed out a little.