
MODS/ACCESSORIES for the GK


Member
Joined: Sep 2014
Posts: 95
From: New York
Here is mine installed. I may take it off as I don't like the bolt showing underneath. I could also not get all three bolts fastened...had to only use two. Does my install look correct? I know it should be straight forward, but I was not sure how far on to the exhaust to place it?

Comment: Mine hasn't arrived yet and I won't like that bolt showing either!!! In the meantime, Kenji815 can chime it with some install tips. If I can get it too look right and straight, may just have the lower bolt discarded and spot weld that portion on. - rttby
Comment: Mine hasn't arrived yet and I won't like that bolt showing either!!! In the meantime, Kenji815 can chime it with some install tips. If I can get it too look right and straight, may just have the lower bolt discarded and spot weld that portion on. - rttby
Last edited by ROTTBOY; Nov 9, 2014 at 02:06 PM.

Member
Joined: Sep 2014
Posts: 293
From: Walnut, CA
I does fit with all 3 If you loosen bolt to almost no thread or you can take the braket off one of top one and just use the bolt only
Here is mine installed. I may take it off as I don't like the bolt showing underneath. I could also not get all three bolts fastened...had to only use two. Does my install look correct? I know it should be straight forward, but I was not sure how far on to the exhaust to place it?
Comment: Mine hasn't arrived yet and I won't like that bolt showing either!!! In the meantime, Kenji815 can chime it with some install tips. If I can get it too look right and straight, may just have the lower bolt discarded and spot weld that portion on. - rttby
Comment: Mine hasn't arrived yet and I won't like that bolt showing either!!! In the meantime, Kenji815 can chime it with some install tips. If I can get it too look right and straight, may just have the lower bolt discarded and spot weld that portion on. - rttby
Member
Joined: Sep 2014
Posts: 95
From: New York
That makes sense. I'll probably just leave it as is. That bottom bolt can only be seen if you get down low. It is not going anywhere either so I'm not so worried about the third bolt. If I change it at all, I'll update.
Thread Starter
|
Someone that spends his life on FitFreak.net
Joined: Mar 2014
Posts: 1,116
From: Hawaii: relocated to Western Canada Sept, 2015
Another unnecessary accessory for LX owners
Got this from Ebay last month and it just arrived. Dealers supposedly don't have an OEM silicone cover, specifically for the GK, but I saw this and knew it would fit the LX's fob. This is an accessory for the 2014 -2015 Honda Civic HF LX
Part # HNDAD94 $6.99 shipped
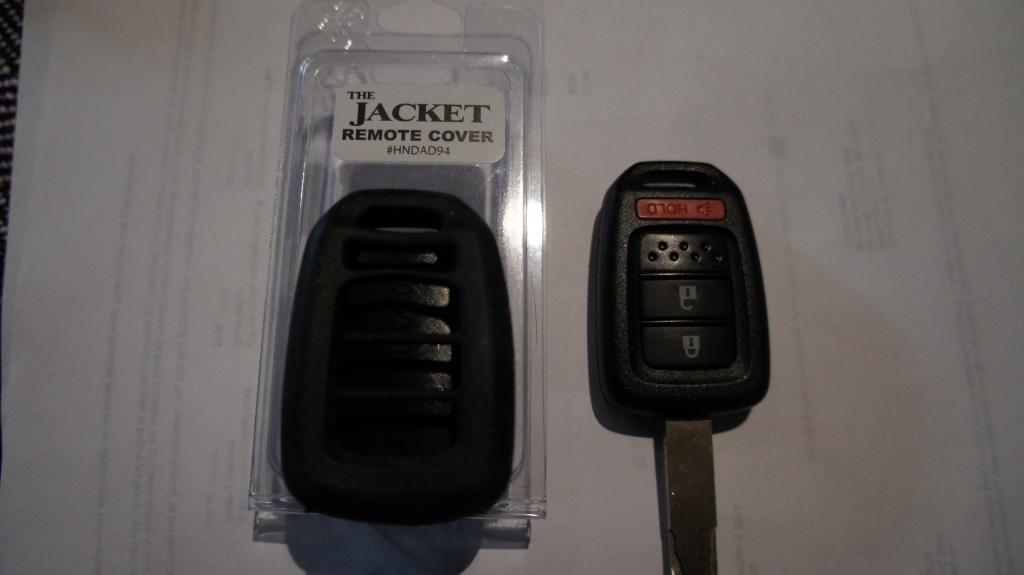
Installed:
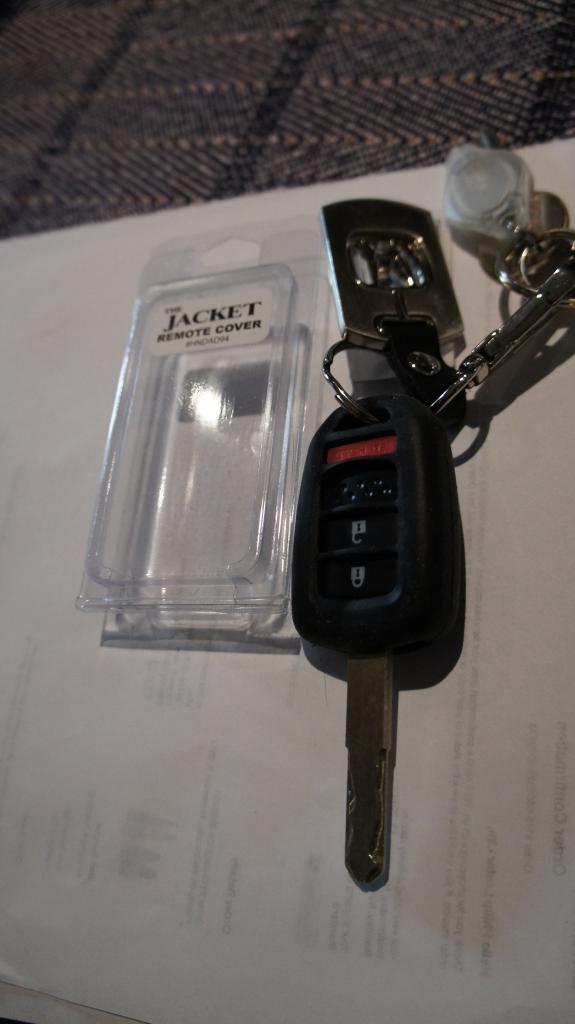
Part # HNDAD94 $6.99 shipped
Installed:

Member
Joined: Sep 2014
Posts: 927
From: The Middle West

Fit > Jazz
I have a growing stack of parts out in the shop awaiting installation on my MSM EX, but decided to go ahead and install one of them tonight since the temps were above 60� F and it's supposed to drop to the low 30s (highs) for the next week:
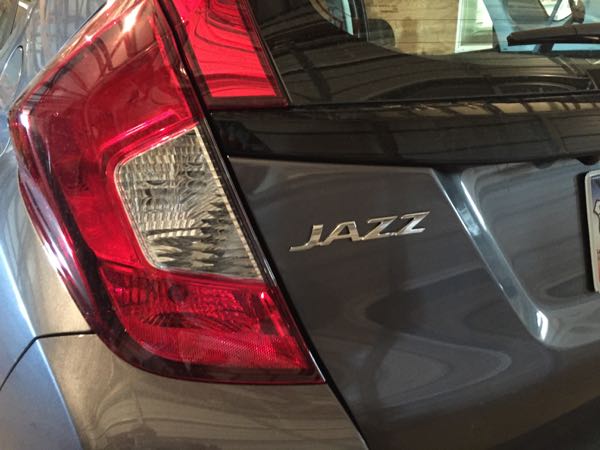
And yes, it's JDM (actually, it's probably AUDM/UKDM or the like, but I sourced it from a JDM parts dealer). So now I have the first US market Jazz!
es
And yes, it's JDM (actually, it's probably AUDM/UKDM or the like, but I sourced it from a JDM parts dealer). So now I have the first US market Jazz!
es

Member
Joined: Jun 2014
Posts: 78
From: Brisbane, Australia
Looks pretty factory. Would likely be AUDM as they are Fit's in Japan. Don't think i got a pic before I debadged my Jazz.
On a different note, has anyone colour sanded their Fit/Jazz yet? How did it come up? I am having a practice on the Toyota that has been replaced by the Jazz and for a hand polish it is coming up pretty well. Would be better with a buffer but this will do the trick.
On a different note, has anyone colour sanded their Fit/Jazz yet? How did it come up? I am having a practice on the Toyota that has been replaced by the Jazz and for a hand polish it is coming up pretty well. Would be better with a buffer but this will do the trick.
Member
Joined: Sep 2014
Posts: 95
From: New York
PUt on my VTEC stickers. I decided to cut out the "DOHC" and just use the VTEC. I thought it looked too "busy" with the door guards and there was nowhere else for me to put them.

I accidentally left behind the top bar on the "V" on the driver side. You can see it in this picture:
(**Notice the "ding" in my door guard. They work!**)
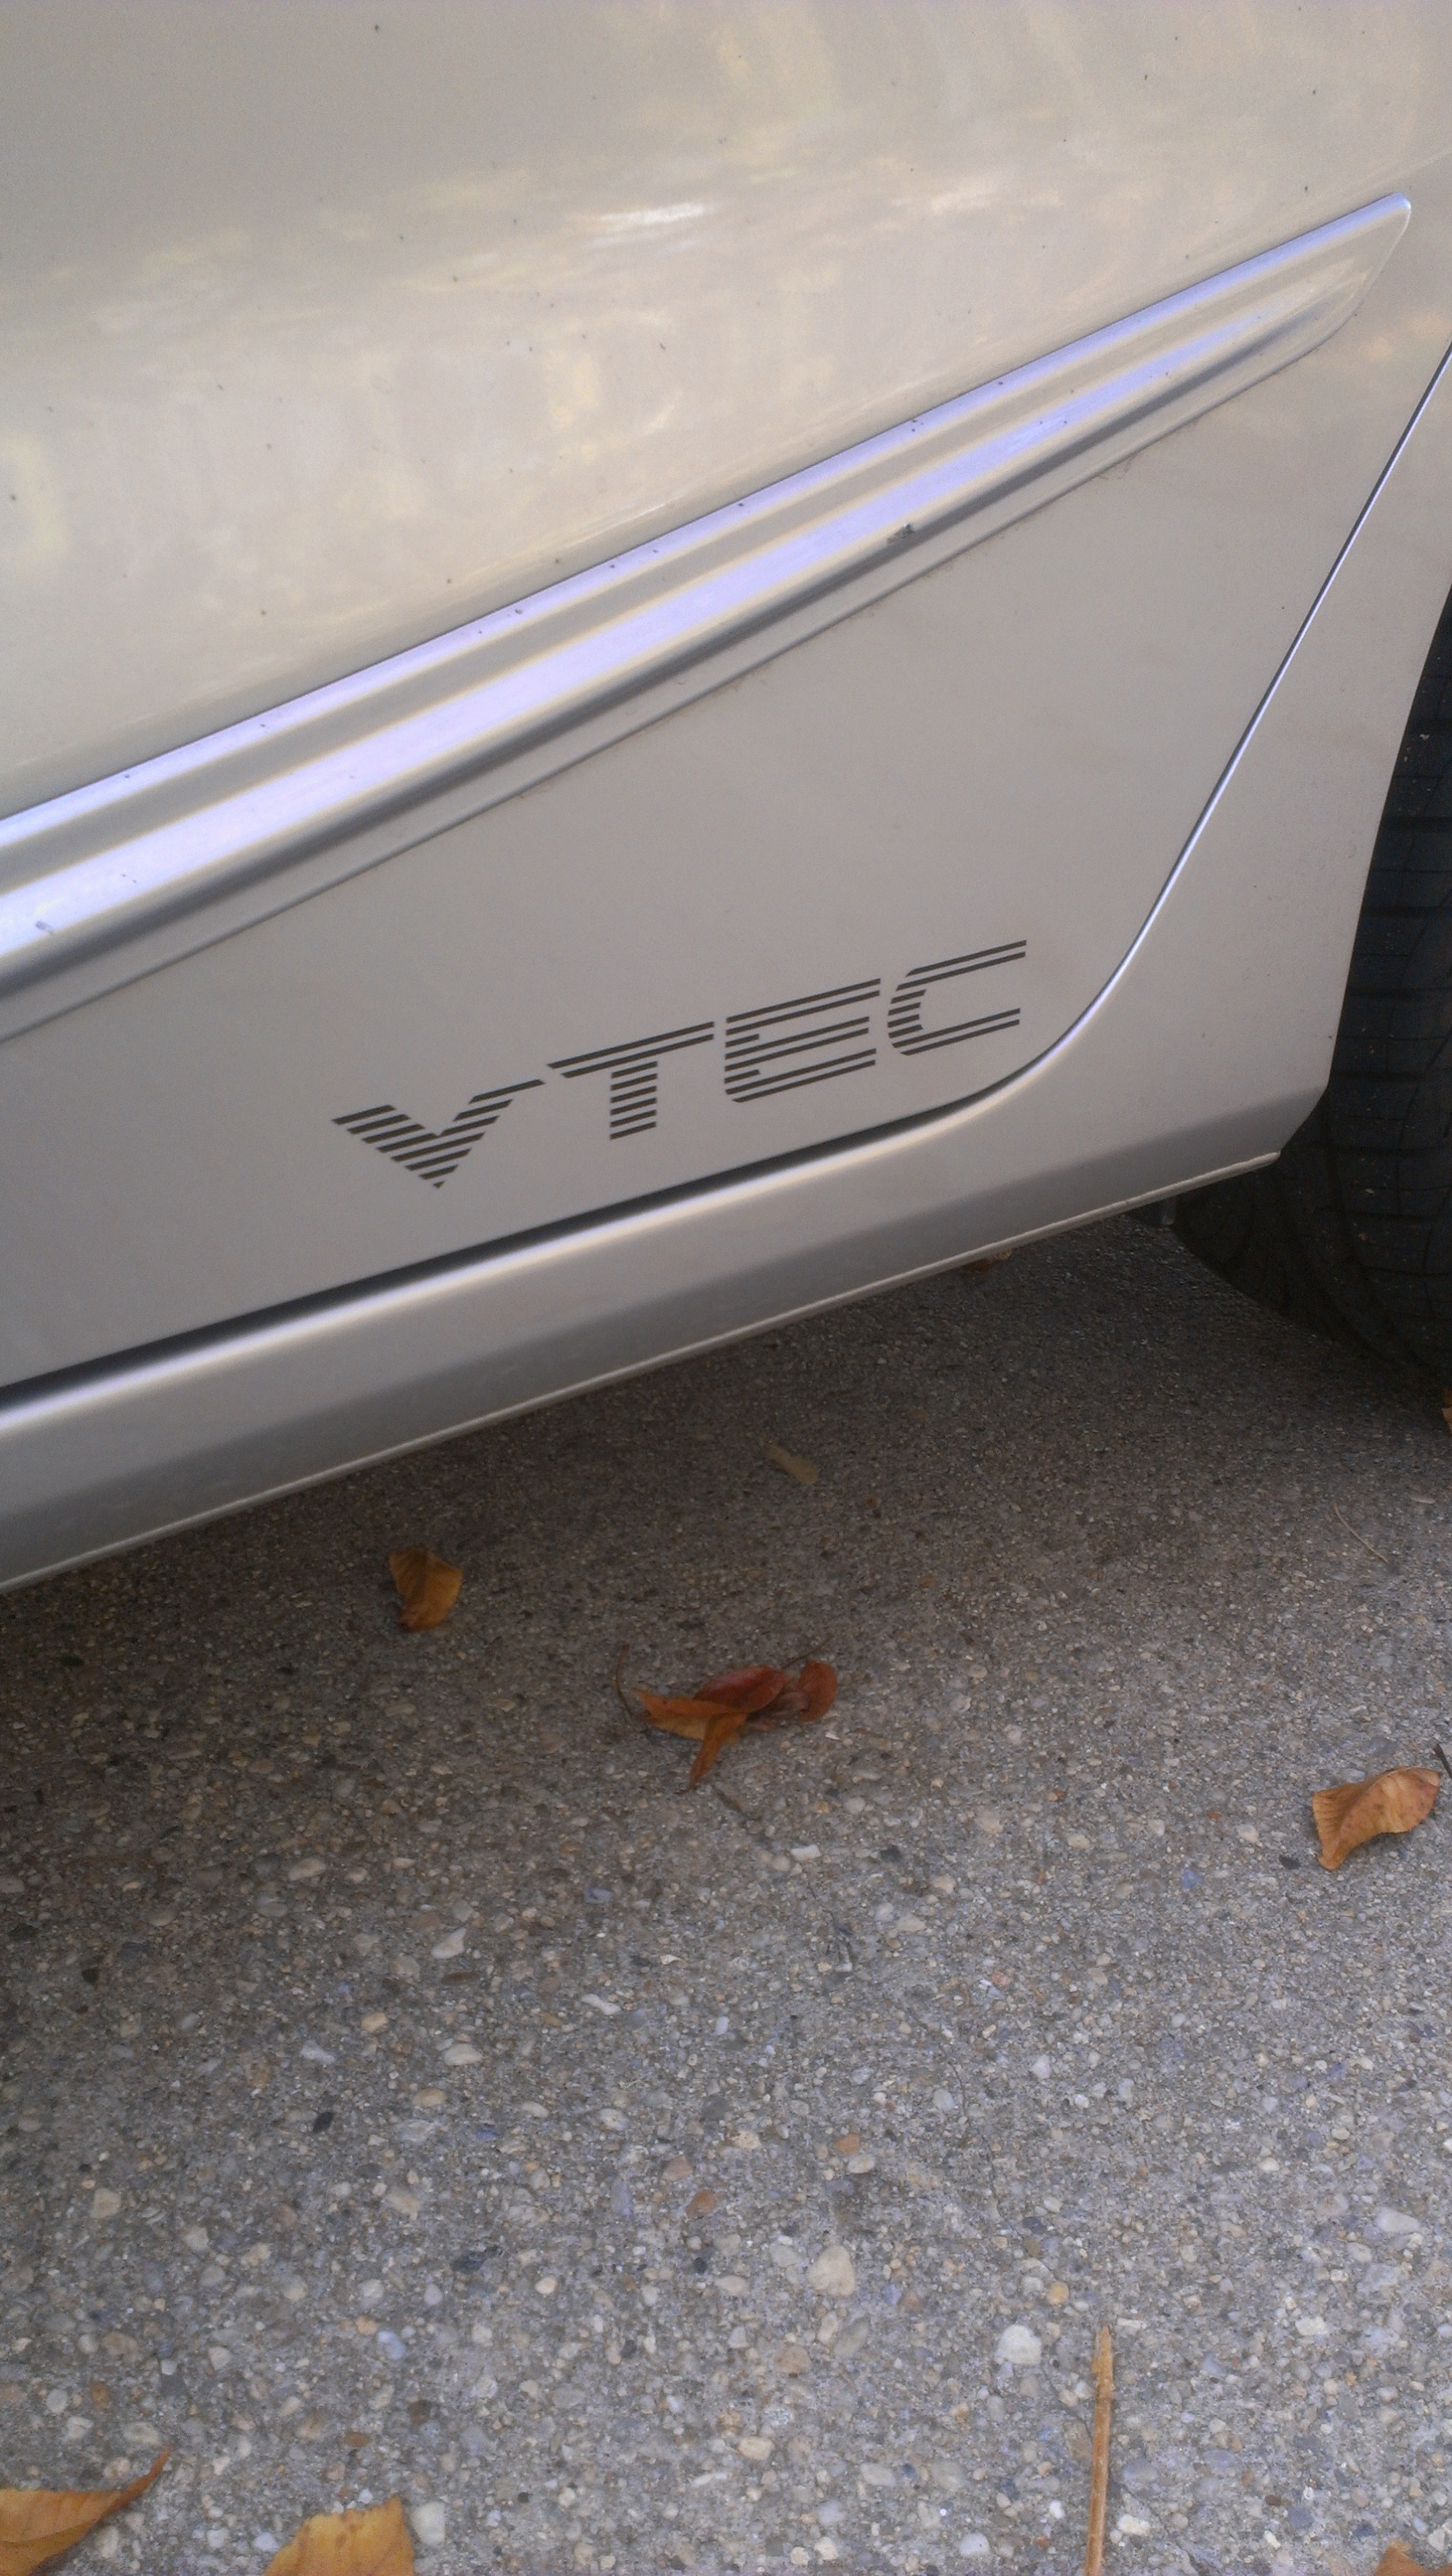
I was pissed at myself as I was super careful. Not sure how that happened, but it did. So, I just went around to the other side and removed the top bar from the other "V." Now I think it looks unique and kinda cool. I saved the "DOHC" decals in case I decide to add them later.
I accidentally left behind the top bar on the "V" on the driver side. You can see it in this picture:
(**Notice the "ding" in my door guard. They work!**)
I was pissed at myself as I was super careful. Not sure how that happened, but it did. So, I just went around to the other side and removed the top bar from the other "V." Now I think it looks unique and kinda cool. I saved the "DOHC" decals in case I decide to add them later.


Member
Joined: Oct 2014
Posts: 342
From: Modesto, CA

I will have to take another look at this. Some folks around here are just careless and had a few dings on my previous car. Even happened when I was in the car one time!! Sheesh

 i'd appreciate feedback

Member
Joined: Jul 2014
Posts: 3,241
From: Shokan, NY
PUt on my VTEC stickers. I decided to cut out the "DOHC" and just use the VTEC. I thought it looked too "busy" with the door guards and there was nowhere else for me to put them.
I accidentally left behind the top bar on the "V" on the driver side. You can see it in this picture:
(**Notice the "ding" in my door guard. They work!**)
I accidentally left behind the top bar on the "V" on the driver side. You can see it in this picture:
(**Notice the "ding" in my door guard. They work!**)
Member
Joined: Jul 2014
Posts: 3,241
From: Shokan, NY
I'm wondering about the door guards myself because most car doors are curved so the the way the guards are positioned way to the bottom I wouldn't think it's where would prevent door dings from other people's cars.
I will have to take another look at this. Some folks around here are just careless and had a few dings on my previous car. Even happened when I was in the car one time!! Sheesh
I will have to take another look at this. Some folks around here are just careless and had a few dings on my previous car. Even happened when I was in the car one time!! Sheesh

That bottom bit sticks out farthest, so if someone next to you opens a door too wide, it's the part that sticks out the most that will get hit. Of course, the shape the attacking door matters, too, but you can't do anything about that.
Speaking of door guards, I wonder how they would look in a color that's different than the car itself. How about red guards on a white car?
Member
Joined: Sep 2014
Posts: 95
From: New York
That is a pretty nasty ding I got on there. It's not just paint. Looks like somebody really swung their door into mine so thank you oddly placed door guard!

Member
Joined: Jul 2014
Posts: 3,241
From: Shokan, NY
Good thing. I'm glad I have them now. I'm not sure if these come standard on the EX and EX-L because I didn't pay for them but I'm happy they are there.
That is a pretty nasty ding I got on there. It's not just paint. Looks like somebody really swung their door into mine so thank you oddly placed door guard!
That is a pretty nasty ding I got on there. It's not just paint. Looks like somebody really swung their door into mine so thank you oddly placed door guard!
Member
Joined: Oct 2014
Posts: 342
From: Modesto, CA
Yep exactly. Almost like you need one of those noodle foam around the car to protect it from people like that.

Here is mine installed. I may take it off as I don't like the bolt showing underneath. I could also not get all three bolts fastened...had to only use two. Does my install look correct? I know it should be straight forward, but I was not sure how far on to the exhaust to place it?
Member
Joined: Sep 2014
Posts: 927
From: The Middle West
After dealing with an injured cow when I got home from work, I had the option of sitting in front of the iMac and looking at all the mods you all are doing, or, going out and tackling one myself:
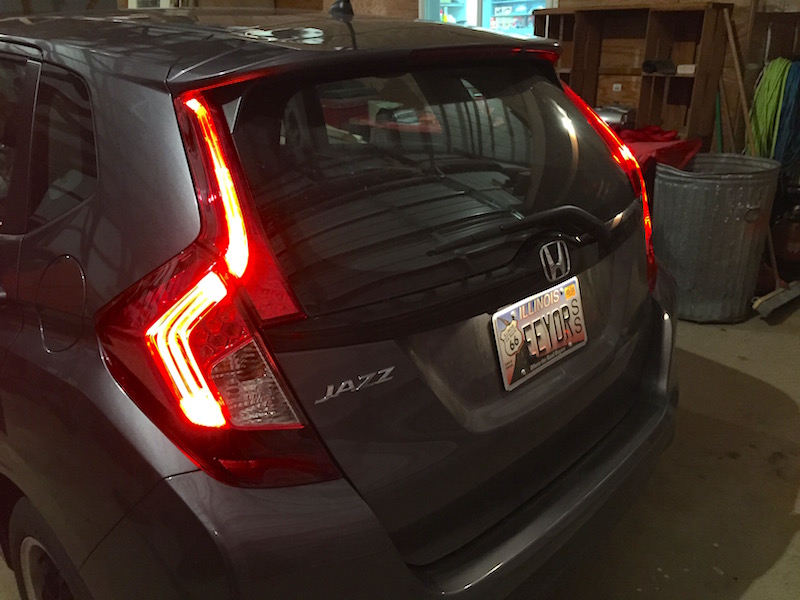


I'm well on the way to converting my USDM Fit to an AUDM Jazz!
After the possibility of reproduction JDM taillights fell through, *and* after I had a couple farm implements finally sell after being on CL all summer, I bit the bullet, er, treated myself, and ordered a set of OEM JDM taillights from a seller in Japan. By going direct, I was able to get a decent discount off the price, but they were still quite spendy!
I took pics as I did the install and will write that up in a few days - got a busy day with the vet tomorrow, I suspect.
es
COMMENT: Awesome result!!!! The First US MDM GK with BOTH OEM JDM Upper and Lower GK LED Hybrid lights. They are looking great!!! Jazz nameplate is very cool. Looking forward to your install posting. - rttby
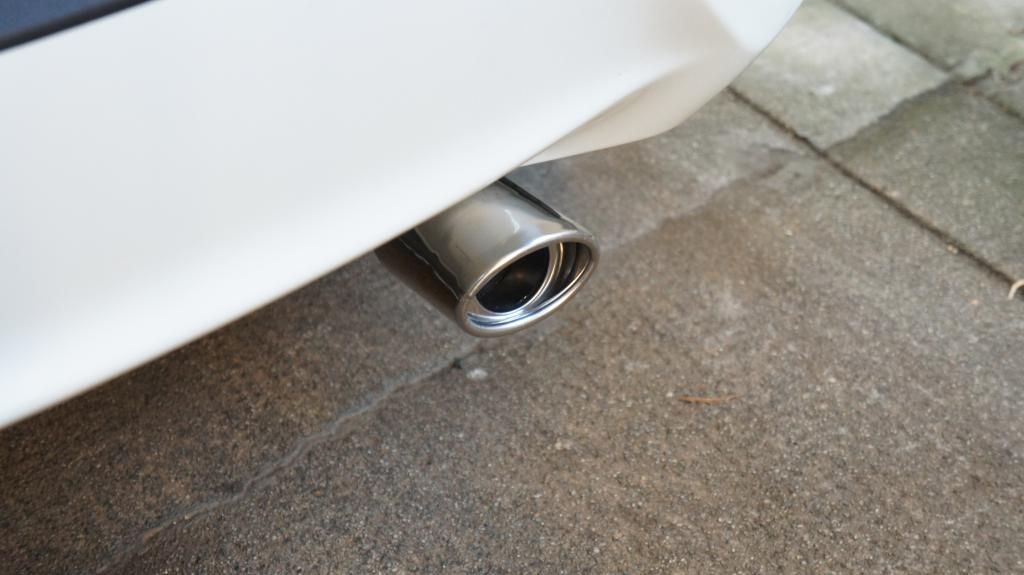
Continuing my mod installs, put on the chrome muffler tip yesterday. Thanks Kenji815 for setting the lead!!!!
I'm well on the way to converting my USDM Fit to an AUDM Jazz!
After the possibility of reproduction JDM taillights fell through, *and* after I had a couple farm implements finally sell after being on CL all summer, I bit the bullet, er, treated myself, and ordered a set of OEM JDM taillights from a seller in Japan. By going direct, I was able to get a decent discount off the price, but they were still quite spendy!
I took pics as I did the install and will write that up in a few days - got a busy day with the vet tomorrow, I suspect.
es
COMMENT: Awesome result!!!! The First US MDM GK with BOTH OEM JDM Upper and Lower GK LED Hybrid lights. They are looking great!!! Jazz nameplate is very cool. Looking forward to your install posting. - rttby
Continuing my mod installs, put on the chrome muffler tip yesterday. Thanks Kenji815 for setting the lead!!!!
Last edited by ROTTBOY; Nov 15, 2014 at 10:12 AM.

Member
Joined: Sep 2014
Posts: 32
From: Nova
After dealing with an injured cow when I got home from work, I had the option of sitting in front of the iMac and looking at all the mods you all are doing, or, going out and tackling one myself:
I'm well on the way to converting my USDM Fit to an AUDM Jazz!
After the possibility of reproduction JDM taillights fell through, *and* after I had a couple farm implements finally sell after being on CL all summer, I bit the bullet, er, treated myself, and ordered a set of OEM JDM taillights from a seller in Japan. By going direct, I was able to get a decent discount off the price, but they were still quite spendy!
I took pics as I did the install and will write that up in a few days - got a busy day with the vet tomorrow, I suspect.
es
COMMENT: Awesome result!!!! The First US MDM GK with BOTH OEM JDM Upper and Lower GK LED Hybrid lights. They are looking great!!! Jazz nameplate is very cool. Looking forward to your install posting. - rttby
Continuing my mod installs, put on the chrome muffler tip yesterday. Thanks Kenji815 for setting the lead!!!!
Member
Joined: Sep 2014
Posts: 927
From: The Middle West
http://www.ebay.com/itm/JDM-Honda-Fit-GK3-4-5-6-LED-Taillight-Illumination-Tube-Type-GENUINE-OEM-/261644156660?pt=Motors_Car_Truck_Parts_Accessories&hash=item3ceb34fef4&vxp=mtr
As mentioned, I ended up buying direct, which saved me a bit. I bought the set of lights and the OEM Jazz badge, and they were $820.00 delivered to my door (including shipping). Spendy, like I said, but you only live once, right?
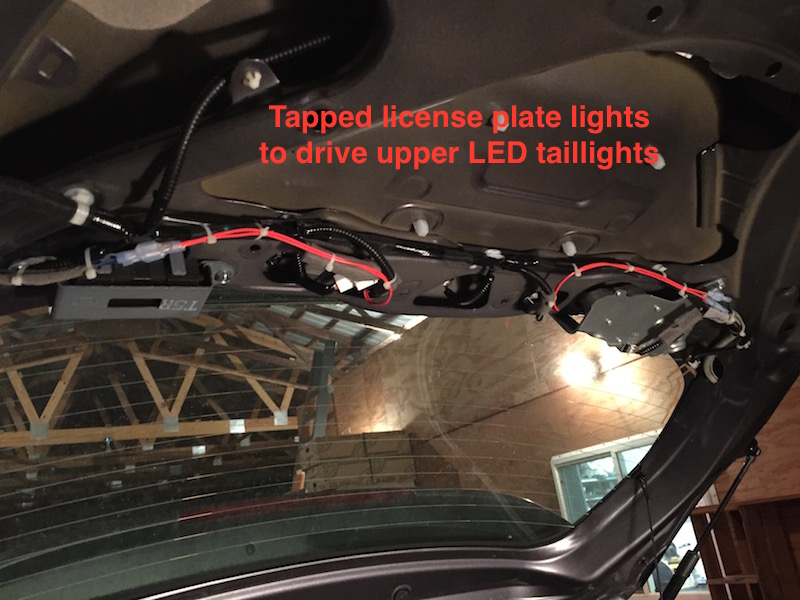
The lights are *not* a plug and play install. If you check out Rottboy's thread on the upper light install, you'll see you have to tap the license plate light circuit to drive the LEDs - not a huge deal, though.
The main brake lights required a bit of hacking (literally and figuratively) as the light bulb sockets are different from USDM to JDM.
Here are the two light housings for comparison (USDM on top):
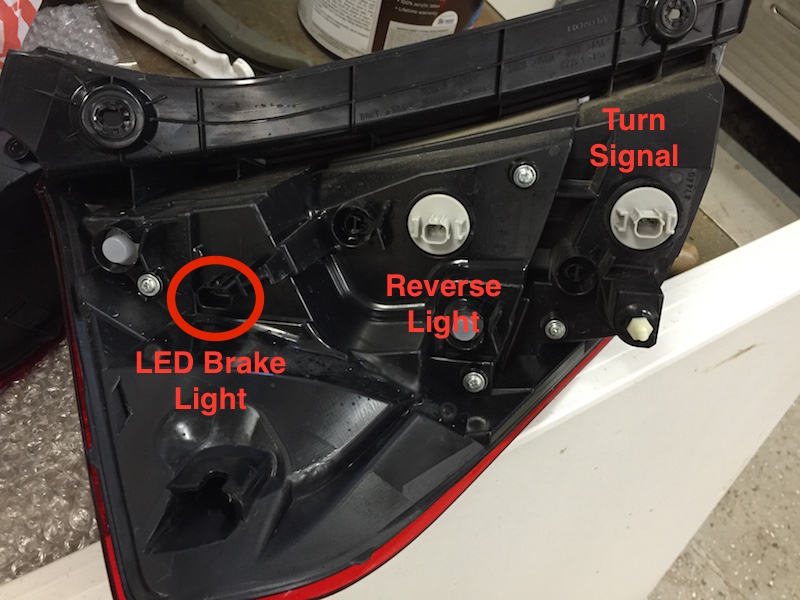
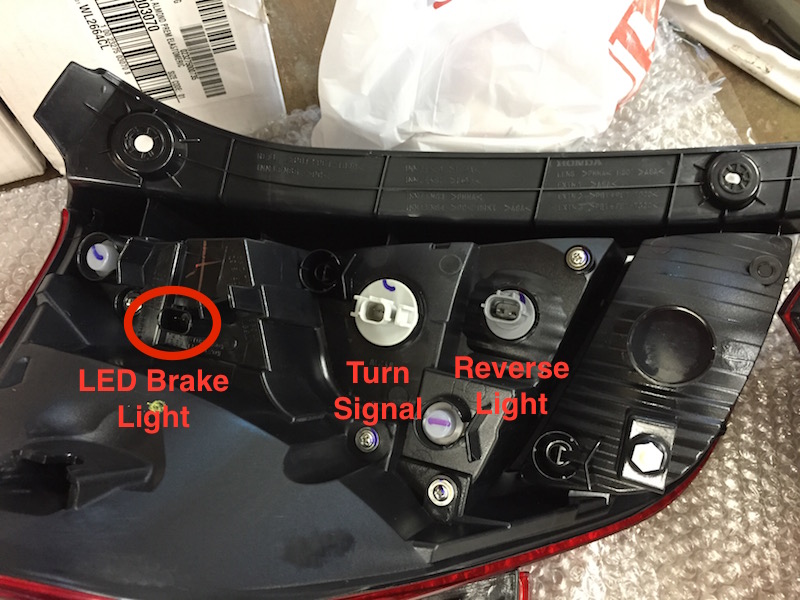
The LED brake light is plug and play, so no worries there.
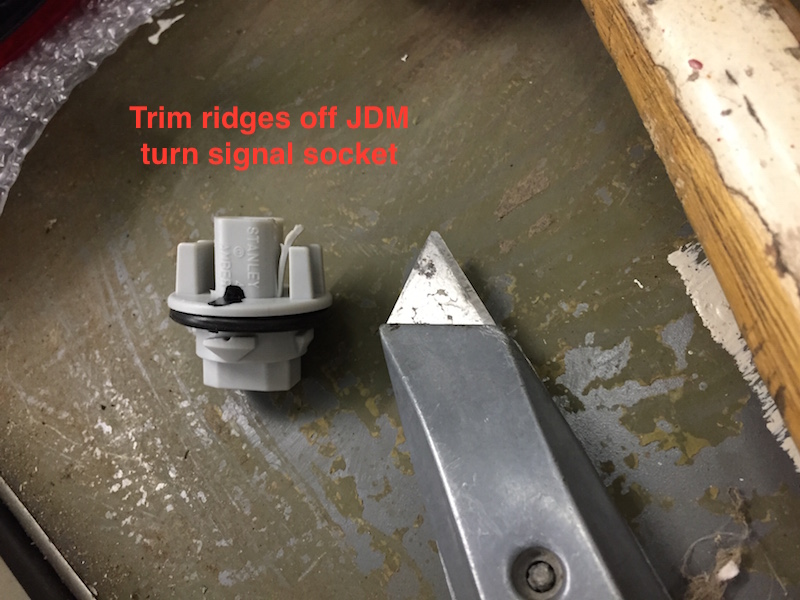
The turn signal plug is slightly different between the two, and by carving the ridges off the JDM light socket, the USDM plug will fit, although the locking tab will not lock (different size). Just push it on - it's a snug fit and shouldn't come off unless you do some Dukes of Hazzard-type jumps.
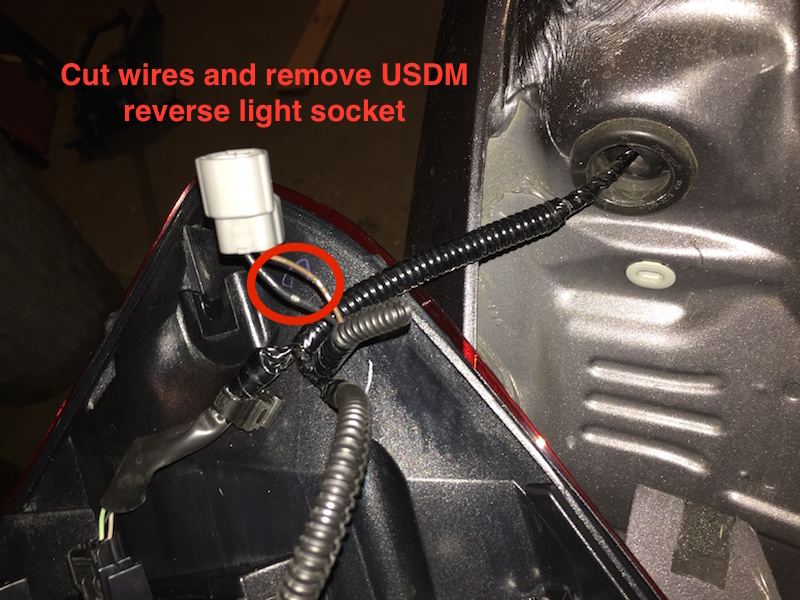
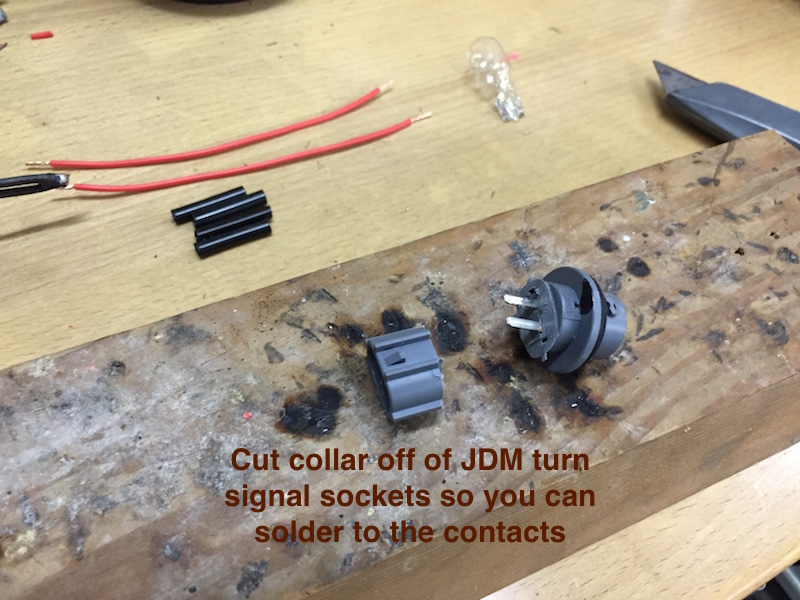
The reverse light uses a smaller socket on the JDM light, and requires some extra wire to reach since the position of the light is different between the two. You'll have to peel back the outer covering and cut the USDM plug off (car side wiring harness), leaving enough wire exposed to later solder your extended JDM plug in place.
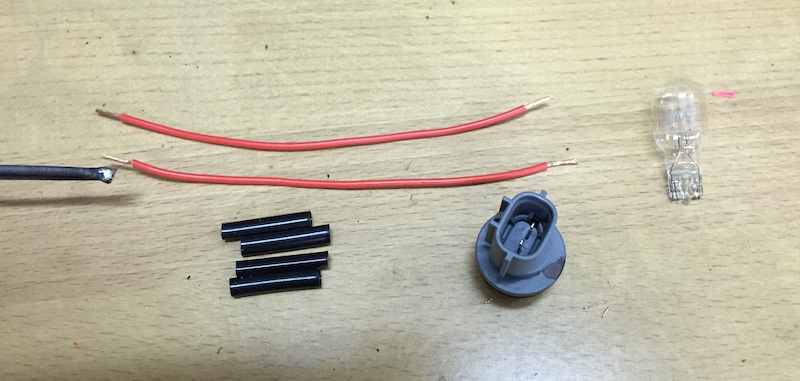
Here are the parts I used to make the new plug with extended wiring:
Since I could not figure out a way to solder down inside the JDM plug, I cut the collar off:
Extended wiring soldered in place:
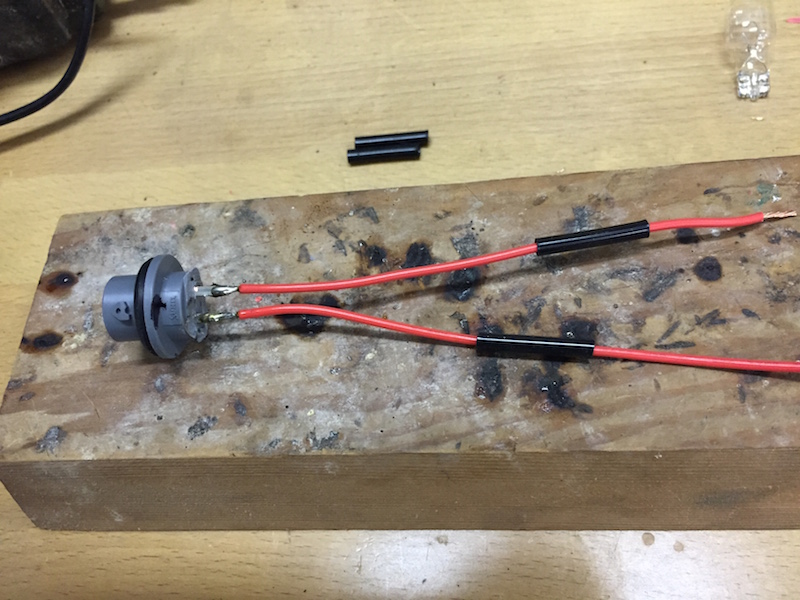
I used heat shrink tubing to tidy it up:
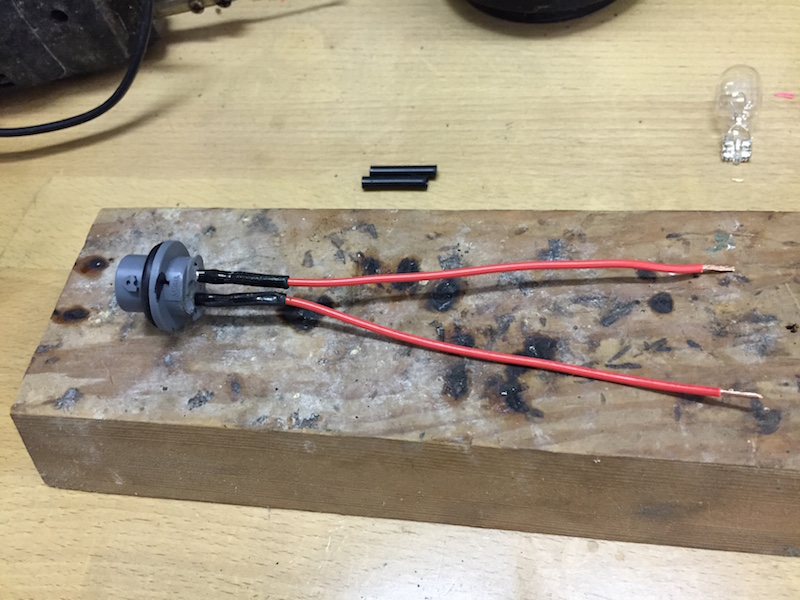
Once that's done, take it out to the car and solder to the wires where you previously cut away the USDM plug. Note that you have to remember to slip your heat shrink tubing on *before* you solder the wires together:
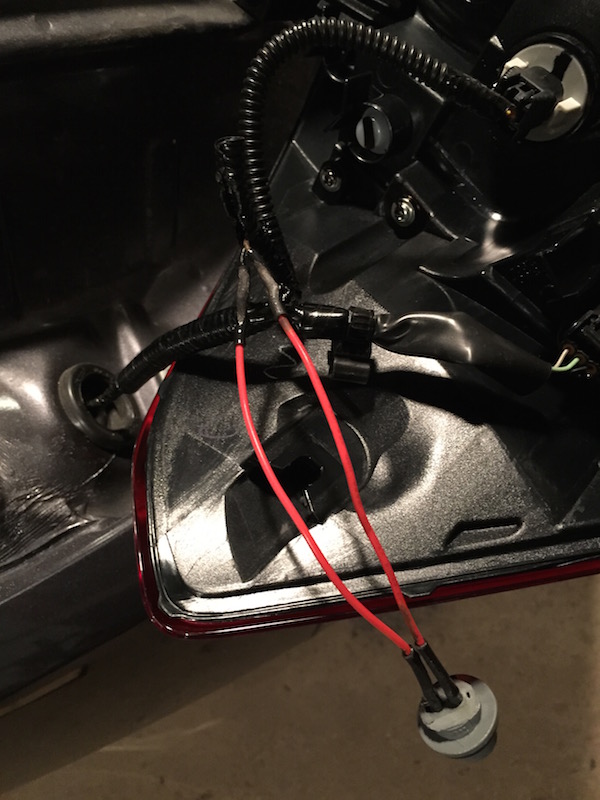
Test everything before you button up the inner beauty panel, and you're good to go!
es
Last edited by stembridge; Nov 15, 2014 at 09:51 PM.

